2007-10-10: Notes on a Dog's Coat
by Meguey
Someone asked me for hints, tips, ideas about how to actually make a Dog's coat. This is what I said.
Although the coats referenced on the Dogs site are Victorian frock coats (Folkwear #263), the pattern I would recommend in making a true-to-cover-art coat would be the Folkwear #106 - Turkish Coat. It works very well for patchwork, and has the right lines. The frock coat's got princess seams, which are very unfriendly to seminole patchwork. You could draft out a different back for the frock coat, I suppose. You could also look at the Australian Drover's Coat, but the raglan sleeve is awkward, and the caplet is a bit off. And you may want to alter whatever coat pattern you use to have the notched collar that she's wearing on the cover.
For doing the piecework, the thing to do is always figure it's going to take twice as much fabric as you think - Seminole work eats fabric with all those seam allowances. It's really fun, but plan on making a good portion more than you think you'll need, and maybe even then have extra fabric around in case you're short. For each coat, you've got a main pallet and a secondary or accent pallet. On the cover, I think of her main pallet as being cream and rust, with black and slate blue/grey as the accents. His is red and black, with green and cream accents.
Figure on making the garment fully lined - that way you have something to stabilize the piecework. If I were doing this, I'd actually cut my pattern pieces out of a lightweight muslin as well as the lining fabric (either a solid or very small-scale print), and then use the muslin as a guide to how much piecework I had to design and create. Then I'd stitch-in-the-ditch on the long seams between bands to hold the piecework to the muslin, then flat-line each piece before I constructed the coat. For the covers, I also made full-sized paper patterns to plan out the piecework. On the more complex piecework, I then used non-fusible featherweight interfacing. I drew exactly what I wanted, then used a combination of the seminole pieced bands and paper-piecing to make certain my seams were all in the right place.
Use some bands of solid color - it breaks up the piecework into discernible chunks, plus it covers space quickly. Don't be afraid of using small-to-medium (pin-dots to quarter-sized motifs) prints - it gives a more period feel, plus it makes for good contrast with the solid bands. For the covers, I chose one main color to be a solid, then let the prints play off that. Obviously, don't use prints that scream "1980!" or the like. Pull out all the fabrics you're thinking of using and let them sit together on a table for a day or two, so you know which ones aren't playing well with others and can replace them.
Some of the piecework bands are really simple. Most of his coat is just black and red stripes. The big lightening bolt on her hips is cake. Some are waaay more complex than you expect; the black diamonds on her upper arm are trickier than they should be, and the greek key on her forearm is straightforward but fiddly. I still haven't figured out if the piece over his shins is even doable.
Here's a big thing, especially for the one you're making for your boyfriend: think as though you were actually making a coat for a Dog, someone you loved who was going out in service and very possibly into danger. What colors and motifs would you use? You don't have to tell anyone your reasons for your choices, but it will lead you out of your usual aesthetic and result in a more lively and interesting coat. I had specific Dogs characters in mind when I put together the covers.
If you make one, share pictures of the process and the product!
2007-10-10 04:20:11 Alexis
Thanks, Meg! I was sort of toying with the idea of making a dog's coat, since I miss costuming and don't really belong to an anime costuming culture anymore. I think this post may end up getting me to actually go ahead with it, once I get my sewing machine up here.
2007-10-10 13:09:11 Meguey
Cool! I'm going to point the someone in question here as well, in case she wants to chime in.
2007-10-10 14:20:27 Emily
This is so awesome, Meg.
And this must be what reading forge speak for non-forgers is like. :)
2007-10-10 18:39:31 Meguey
*laughs* Yeah, there's a ton of sewing terms that only make sense when you know what they mean. At lease with sewing, you're talking about a concrete thing, not an idea. There's no discussing whether a dart is really merely a fold - it is a dart, or it is not. Pretty clear.
2007-10-10 18:50:20 Meguey
Some notes on quilting a coat.
I'd treat each pattern piece as a separate quilt, but I would not bind the edges.
I'd suggest either a mid weight-flannel or a single layer of Warm&Natural cotton batting, with preference to the flannel, because it's less likely to shift and bunch with wear, and it will need less quilting to secure it, since it's a woven fabric in it's own right.
2007-10-10 19:06:22 Sarah
First, LOL about the Forge speak for non-Forgies. Indeed a dart is just a dart. Though since I'm new to quilting (what a first project, eh?) I'll probably pester you to define some of the terms.
I like flannel batting as well to give it weight and some more stability since I plan to distress the bejeezus out of the coats once they are done. But maybe I'll see if I can get away without it since it'll have the quilting, the muslin and then a full lining and I hope to wear it around GenCon so to not make it too terribly warm.
I'm hoping to go fabric shopping soon once I math out general yardage, but I plan on just getting a whole ton. I'll put up pictures as I go along.
2007-10-10 20:08:34 Emily
(My favorite term is definitely "stitch-in-the-ditch")
2007-10-10 20:52:42 Meguey
If you're planning heavy distressing, consider looking for light-weight denims or fine-wale corduroy as one of the main fabrics. They are studier than quilting calicos, and will take distressing better. It also depends on if you're thinking of additive distressing (dirt, blood, scorch marks, ink, grease) of subtractive distressing (mended tears, holes, actual burns, artificial wear marks on the cuffs). Even calico will handle additive distressing ok.
I've always erred on the side of 'actual wearable clothes' when making clothes not normal to my everyday wear. To that end, make it comfortable to wear around, as well as just for a while at a con. Another reason to go with flannel, because you don't want it to get too heavy or hot.
My favorite costume at GenCon two years back was a fantastic Jedi costume that he'd put enough thought and construction into that he looked utterly comfortable in his clothes, and all the modern things he needed were easily concealed in pockets. No reason not to put practical pockets on the inside of your coat for you wallet and iPod and hotel keycard :)
2007-10-11 12:14:13 Sarah
Smart thinking about the inside pockets, I had thought of that and with all the lining and whatnot it'd be easy to add a few extra pockets on the inside. And making it as comfortable as possible. That's the whole idea behind the coat is that they'd wear it all the time every day so it'd need to be comfortable. You've convinced me to go with the flannel batting after all.
One more question: What is flat-lining?
2007-10-11 13:02:00 Meguey
In regular sewing, you put two pieces face to face, or right sides together, sew along the edge, and turn it right side-out, so the seam is on the inside, or wrong side.
Flat-lining is when you have one piece of fabric, usually the more delicate, and you lay it face up on top of the muslin (or whatever fabric you are using to flat-line) and sew all the way around the edge of the pattern piece, usually a narrow 1/4 inch from the edge of the fabric. This adds a second layer to the top fabric, stabilizes it, and doesn't add bulk because you're not turning it inside out.
Then you take your pattern piece with reinforced top fabric, lay it face to face with the next pattern piece, and sew along the edge as usual.
So, in my suggestions above, what I'm saying is:
Take your piecework, lay it face up on the muslin pattern piece. Pin it well. Sew along the long straight seams between rows on the piecework to secure it to the muslin. Then sew around the whole outside edge of the muslin-and-piecework so it can be used as one stable pattern piece. I suspect in practice you could do either the flat-lining or the stitch-in-the-ditch first, so long as they both get done.
2007-10-11 13:32:25 Meguey
So the thickness of each piece is:
Piecework
Muslin flat-lining
Flannel batting
Lining fabric
That will be plenty warm, but not too heavy or too hot, and will still be flexible and comfortable. You could quilt the
Piecework
Muslin flat-lining
Flannel batting
together, then treat the lining as a regular lining that would cover and protect all the interior seams. Yet another benefit of using flannel fabric as the batting.
2007-10-11 13:37:23 Meguey
A note on quilting:
You could even treat the flannel as part of the flat-lining (cut the same pattern from the flannel and the muslin, flat-line *them* together, then add the piecework) to cut out a few steps and avoid having to quilt each piece twice.
With seminole work, by far the easiest is just to quilt along the long lines. If you want something else, try geometrics that compliment the piecework. The solid bands look best (IMHO) either left plain or with very simple organic shapes, like a sinuous line or little spirals or vines or so one. Width is obviously an issue as to what looks good, as is personal preference.
2007-10-11 14:01:44 Sarah
That all makes perfect sense and I think I will flat-line the flannel and the muslin together and then stitch-in-the-ditch through both layers leaving the lining w/o quilting for adding the pockets and hiding all the stitching. I might do some hand-tacking just to make sure it all stays in place.
I'll probably just stick to quilting along the straight lines of the bridging strips between each piecework part
2007-11-04 21:35:58 Sarah
So I've gotten some work done on the coat. I let all the fabrics sit and simmer for a while and flat-lined the muslin to the flannel before starting the piece work. I started from the top and am working my way down from there.
I also got a new jacket pattern that doesn't have the set-in sleeves that the cover art shows, but it has other straight seams that has been pretty easy to work with so far and no damn princess seams.
I am afraid that its looking VERY yellow at this time (I swear it looked better on the table combined) but I'm planning on dyeing the whole thing with tea once its done so that should help cut the brightness of it. As well as all the other additive distressing I'm hoping that it tones it down. I'm going to put the dark red binding around the edges to also hopefully tie it all in a little better.
The rows are not quite to scale with the drawing, but its close enough for me at this time. :)

2007-11-05 00:29:40 Meguey
That looks fantastic! So that's the back and two fronts all in one piece, right? Then a raglan sleeve. Hmm. That will make interesting diagonal lines on the chest - what's your plan there? I'd maybe pipe them and make it a design feature, rather than try to ignore it. I don't know. If the piecing's matching up well enough, maybe I wouldn't.
All this to say: I'm looking forward to the next bit!
2007-11-05 13:40:32 Sarah
Thanks! I haven't quite decided how I am going to handle the sleeves but I'm leaning now towards the "make it as close as you can, but don't kill yourself over the details" method of construction if only to save my sanity and from having to re-do 75% of what I've done so far.
2007-11-05 16:53:03 Meguey
For the tea-dyeing, take the scraps from the piecework and dye them first, so you have an idea of how dark you want it and what tea works. Some tea has really green overtones which I can't see doing nice things to the yellow. Expect it to take more tea than you think, because you'll be tea-dying the whole thing, and the flannel etc will soak up some of the tea.
If I were thinking about tea-dying something like this, I'd want to use the bathtub, probably, and lay the coat in piecework side up, pour the tea over, let it steep for as long as I liked as per my test bits, smooshing it around to cover.
Then put in in the washer on the spin cycle to get the excess tea out before either line-drying it or machine drying it on gentle. You'll get some variation in dye, which is probably fine, given the distressing wanted.
2007-11-05 17:23:04 Sarah
I like using the spin cycle for removing some of the extra tea before drying it.
Do you think though, that if after I let it steep I wrung it out and hung it up to dry, the tea would run down and make the bottom darker than the top to emphasize the worn/hard-ridden look?
2007-11-06 14:39:50 Meguey
Yeah, that'd be good too, but you'd really have to wring the crap out of it, and the twisting *might* cause trouble for the piecework unless it's securely quilted. Spin cycle spins the whole garment as a unit, rather than bits of it against each other.
Another more irritating but less damaging method would be to press the heck out of it with dry towels - one underneath, one on top, blot like mad, change towels as they get damp. That gives you a whole mess of slightly tea-stained towels, though.
A spin cycle will leave it damp enough to give some of the dip-dyed/worn effect you want, while making it manageable to hang dry from there.
However you remove the first bulk of the water, to support the weight of all that wet fabric, I'd suggest either laying it across a couple lines to support the top and let it hang from roughly the waist down, or use several wide plastic hangers duct-taped together to make a 3"-4" wide hanger. Maybe even pad the hanger a bit to avoid sharp angles getting pulled into the shoulders as the coat dries.
2007-11-06 19:30:44 Meguey
Sarah, would you mind putting a regular 12" ruler down on the piece you've got so far and slapping another pic up here, so the viewers at home can get a sense of scale?
An your piecework looks really sharp, especially for a first project! The narrow orange interior stripe in the large brown Xs is really great; did you piece that or did you find a striped fabric that worked?
2007-11-06 20:58:03 Sarah
Good notes on the weight of all that wet fabric (and flannel), spin cycle it should be. Though I'm also pondering the idea of hand "painting" it with the tea or dye but worry about a really artificial look.
I will get a reference shot of the size tonight at home to give an idea of scale.
I pieced the X's. For being such a simple shape it cause me the most head scratching for some reason.
It isn't super exact and square and all, but its made with love and the imperfections are endearing - at least that's what I'm telling myself.
2007-11-07 20:26:03 Meguey
Painting the dye on could work, but it will give you a different look. If it goes on dry cloth, you could get water rings. If you use a spray bottle and wet down just the top first, it won't soak up so much liquid as if you immersed the whole thing, and the top fabric will dye with less hard edges around the water. Again, this is where the scraps can help, but be sure you've got a big enough piece, maybe a foot or so square, to test the technique.
2007-11-08 15:12:19 Sarah
I realized that all of my rulers are some variation of clear so I just put the Dogs book down to get an idea of scale.
Its totally off compared to the cover, but the only way to fix it is by starting over and making some of the bands smaller so instead (since I don't want to redo all that work) this coat is officially "inspired by" the cover art. :)

Yeah I think ultimately, I'm going to go with the fully submerged, spin cycled and drip dried look so I can get the bottom darker than the shoulders to make it look more worn. I'm also hoping to just wear it a lot in the spring so I can get some natural wear in it as well to get a better idea as to where to add the distressing.
2008-03-09 15:53:35 Sarah
I'm still working on this coat. Took some time off over the holidays, but the sleeves are on and I added some welt pockets. All that's left is the lining, some inside pockets and some kind of closure for the front.
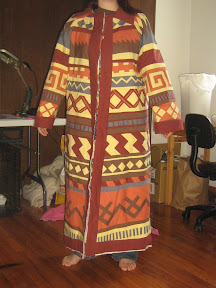

Its pretty shapeless right now, but I plan on adding a belt thing across the back to bring it in a bit. Hopefully I'll have it done by Forge Midwest in Madison so I can show it off there. Hehe
Thanks for all your input on this!
-Sarah
2008-03-12 12:34:15 Meguey
WOW!
That's really cool. For closures, I'd suggest toggles. Maybe add a piece of the plain rust under the toggle side, so when the loop is fastened, there's no gap to show the clothes underneath. Warmer that way, too.
A belt in the back would be perfect. You'll get some cool lines down the back without messing up the front. If you wanted to shorten the sleeve a bit without too much work, the rust band on the upper arm looks like the place. It could be half it's current width without looking to narrow. I'd put the belt and toggles on first, though.
How much does it weigh? Is it comfortable to wear? How long has it taken you? How much cloth did it take yard-wise? Are you sure this is your first quilted garment or are you having us on ;) ?